"## Disclaimer:
*Since this is getting some traction, I just want to leave a note that I often write blog posts or journals after an implementation to sort through what the hell I just wrote. I iterate after that, and usually update the post. In this case, I've been pretty busy and have not had a chance to update this with some of the changes I've made since.*
*This is now available as a library! *[*https://github.com/bluesky-social/react-native-uitextview*](https://github.com/bluesky-social/react-native-uitextview)*. Please review the Limitations list, as there are a few.*
Recently for the first time I realized that the `<Text>` component in React Native is not selectable on iOS. What? But there's a `selectable` prop on `<Text>` what are you talking about? Well, turns out that it is true. First, it's important to understand the different types of text elements that UIKit provides.
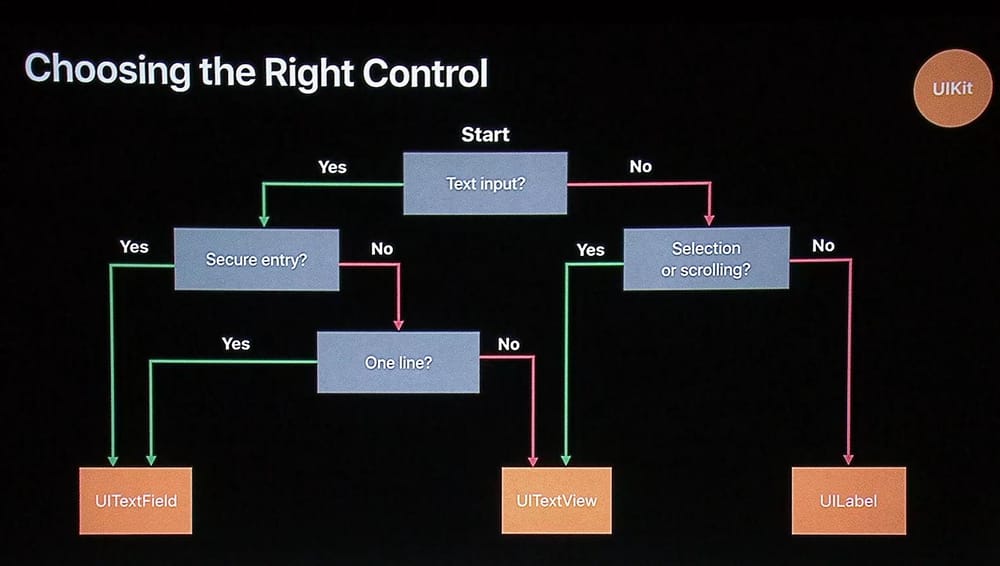
On iOS, `<Text>` uses iOS's `UILabel`. This makes sense since in most cases we don't actually need to have selection for our text. Also, since we can easily create scroll views, we don't need the scroll capability of UITextView (UITextView inherits from UIScrollView, but we will just disable that).
Unfortunately, `UILabel` does not support highlight selection. If we set `selectable` to true, the only new interaction we can have is a press-and-hold for a "Copy" option, which just lets us copy the entirety of the text.

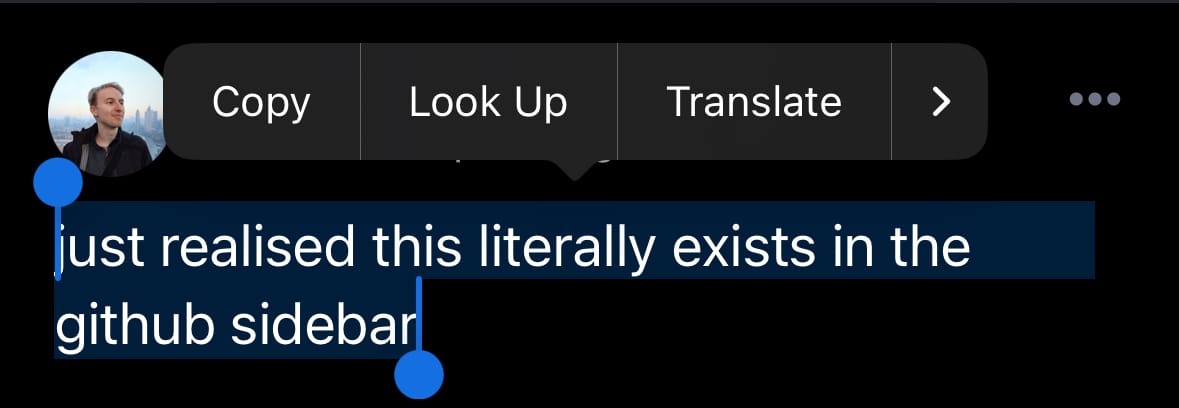
This is fine in some cases, but what if the user wants to select just a portion of the text? Naturally, the first thing that comes to mind is using `<TextInput>` and setting `editable` to false. Let's see what happens now:
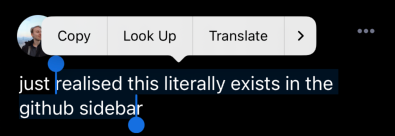
It works! The reason for this is that `<TextInput>` uses `UITextView` whenever we set the `multiline` prop to `true`. We can apply whatever styles we want to individual `<Text>` items and place all of that inside of our `<TextInput>`. Wonderful, looks like we are finished here! Except...what happens if we need press events on this text?

Looks like this should work right? Unfortunately not. Although the styles are properly set on the pressable text, the press gestures are not actually registered. I'm not certain, since I have not looked underneath at this, but I would assume that since React Native assumes the text inside of `<TextInput>` is going to be editable, they are not bothering to apply the press events to the individual `NSAttributedString`s inside of the view (there could also be some other gesture recognizers they are using on the `<TextInput>` that are blocking them, I don't know). Looks like we are back at square one.

Fortunately, creating our own native code in React Native is Easy™.
## Can we use Expo Modules?
First of all, if you really just want to plug this into your own app, you can grab the code from [the Bluesky app repo on GitHub](https://github.com/bluesky-social/social-app). It's fairly well featured and *should work* mostly in line with RN's `<Text>`. Just replace `<Text>` with `<UITextView>` (and all nested children as well) and boom, you're golden. However, if you're moreso just curious about how to do something like this on your own (whether for the same integration or something similar), read on.
It would be nice if we could use Expo Modules for this - it's a much cleaner API when writing native modules with Swift and Kotlin - however, as of right now this won't be possible.
Because we don't know the dimensions of the text we are passing to the view, we are going to need to perform the layouts on the native side *before* mounting. This will require use of React Native's shadow view. Unfortunately, we are not able to interface with the shadow view using Expo Modules yet.
I'm going to assume you have some experience building a native module, so I won't go into how to get that setup. I also won't be giving much detail about the shadow view, for two reasons: 1. it really needs a blog post of its own and 2. it's undocumented and, frankly, I am certain that I do not know enough about it to give you an explanation. If you are really curious, looking at React Native's text component as well as Facebook's Yoga documentation is helpful.
## How does <Text> work?
You might be thinking this is going to be as easy as passing a `value` prop to our new native module, rendering the `UITextView`, and setting it's `text` value to `value`. We could probably just pass in a little style object (or even just use default styles) and set those as well, but it isn't really that hard. And you'd be right if all you care about is creating a quick little string. But of course, if that's what you wanted to do, you could just wrap your `<Text>` inside of `<TextInput>` like we've already seen. Nope, not going to work here.
It's useful to take a quick peek at how React Native handles nested Text components already (you can see the code [here in their repo](https://github.com/facebook/react-native/blob/f30acc6f5c04857a3df47bb6f1b428af57a477b0/packages/react-native/Libraries/Text/Text.js)). There are a few basic steps:
- Create a context to keep track of whether the current `<Text>` that's being rendered is an ancestor or not.
- Wrap the first `<Text>` inside of this context.
- Render `<NativeText>` for the root `<Text>` component.
- Render `<NativeVirtualText>` for each ancestor, rendering it inside of the `<NativeText>` component.
There's some more that goes on here, mainly to do with setting up event callbacks for presses (which we are going to handle slightly differently here), but that is the gist of it.
## Setting up the logic
We are going to want to copy this logic. That means we need to create two new modules, which we will just call `ExpoUITextView` and `ExpoUITextViewChild`.
On the native side, we need to get our props over.
#import <React/RCTViewManager.h>
@interface RCT_EXTERN_MODULE(RNUITextViewManager, RCTViewManager)
RCT_REMAP_SHADOW_PROPERTY(numberOfLines, numberOfLines, NSInteger)
RCT_REMAP_SHADOW_PROPERTY(allowsFontScaling, allowsFontScaling, BOOL)
RCT_EXPORT_VIEW_PROPERTY(onTextLayout, RCTDirectEventBlock)
RCT_EXPORT_VIEW_PROPERTY(ellipsizeMode, NSString)
RCT_EXPORT_VIEW_PROPERTY(selectable, BOOL)
@end
@interface RCT_EXTERN_MODULE(RNUITextViewChildManager, RCTViewManager)
RCT_REMAP_SHADOW_PROPERTY(text, text, NSString)
RCT_REMAP_SHADOW_PROPERTY(color, color, UIColor)
RCT_REMAP_SHADOW_PROPERTY(fontSize, fontSize, CGFloat)
RCT_REMAP_SHADOW_PROPERTY(fontStyle, fontStyle, NSString)
RCT_REMAP_SHADOW_PROPERTY(fontWeight, fontWeight, NSString)
RCT_REMAP_SHADOW_PROPERTY(letterSpacing, letterSpacing, CGFloat)
RCT_REMAP_SHADOW_PROPERTY(lineHeight, lineHeight, CGFloat)
RCT_REMAP_SHADOW_PROPERTY(pointerEvents, pointerEvents, NSString)
RCT_EXPORT_VIEW_PROPERTY(text, NSString)
RCT_EXPORT_VIEW_PROPERTY(onPress, RCTBubblingEventBlock)
@end
And on the JS side:
import {
requireNativeComponent,
UIManager,
Platform,
type ViewStyle,
TextProps,
} from 'react-native'
const LINKING_ERROR =
`The package 'react-native-ui-text-view' doesn't seem to be linked. Make sure: \n\n` +
Platform.select({ios: "- You have run 'pod install'\n", default: ''}) +
'- You rebuilt the app after installing the package\n' +
'- You are not using Expo Go\n'
export interface RNUITextViewProps extends TextProps {
children: React.ReactNode
style: ViewStyle[]
}
export interface RNUITextViewChildProps extends TextProps {
text: string
onTextPress?: (...args: any[]) => void
onTextLongPress?: (...args: any[]) => void
}
export const RNUITextView =
UIManager.getViewManagerConfig('RNUITextView') != null
? requireNativeComponent<RNUITextViewProps>('RNUITextView')
: () => {
throw new Error(LINKING_ERROR)
}
export const RNUITextViewChild =
UIManager.getViewManagerConfig('RNUITextViewChild') != null
? requireNativeComponent<RNUITextViewChildProps>('RNUITextViewChild')
: () => {
throw new Error(LINKING_ERROR)
}
export * from './UITextView'
Let's also create the JS component that will replace `<Text>`. This is going to be pretty similar to React Native's existing code.
import React from 'react'
import {Platform, StyleSheet, TextProps, ViewStyle} from 'react-native'
import {RNUITextView, RNUITextViewChild} from './index'
const TextAncestorContext = React.createContext<[boolean, ViewStyle]>([
false,
StyleSheet.create({}),
])
const useTextAncestorContext = () => React.useContext(TextAncestorContext)
const textDefaults: TextProps = {
allowFontScaling: true,
selectable: true,
}
export function UITextView({style, children, ...rest}: TextProps) {
const [isAncestor, rootStyle] = useTextAncestorContext()
// Flatten the styles, and apply the root styles when needed
const flattenedStyle = React.useMemo(
() => StyleSheet.flatten([rootStyle, style]),
[rootStyle, style],
)
if (Platform.OS !== 'ios') {
throw new Error('UITextView is only available on iOS')
}
if (!isAncestor) {
return (
<TextAncestorContext.Provider value={[true, flattenedStyle]}>
<RNUITextView
{...textDefaults}
{...rest}
ellipsizeMode={rest.ellipsizeMode ?? rest.lineBreakMode ?? 'tail'}
style={[{flex: 1}, flattenedStyle]}
onPress={undefined} // We want these to go to the children only
onLongPress={undefined}>
{React.Children.toArray(children).map((c, index) => {
if (React.isValidElement(c)) {
return c
} else if (typeof c === 'string') {
return (
<RNUITextViewChild
key={index}
style={flattenedStyle}
text={c}
{...rest}
/>
)
}
})}
</RNUITextView>
</TextAncestorContext.Provider>
)
} else {
return (
<>
{React.Children.toArray(children).map((c, index) => {
if (React.isValidElement(c)) {
return c
} else if (typeof c === 'string') {
return (
<RNUITextViewChild
key={index}
style={flattenedStyle}
text={c}
{...rest}
/>
)
}
})}
</>
)
}
}
Let's note a few things here:
- Any time we encounter an element who's child is a type of `string`, we need to render a `RNUITextViewChild`. React Native doesn't let us render plain text outside of a `<Text>` component, and while this might be something that we could remedy, it isn't worth the extra headache. Instead, we can just use a `text` prop on the view.
- The root view receives the styles as well. The root view is actually just a regular `RCTView` that uses flex box. Since we might apply things like `padding` or `margin` to the text, we want that to be reflected on the container.
Every child, recursively, gets rendered until we either encounter plain text in the child...or we don't. We cannot simply look through the children in `React.Children.toArray()` and create a new array of elements, since if we did that we wouldn't be rendering *everything*. Imagine:
<UITextView>
Here's some text <Text style={{color: 'red'}}>and here's some red text <Text style={{lineDecoration: 'underline'}}>that is eventually underlined</Text></Text>
</UITextView>
If we don't actually render these additional `<Text>` components, we won't know what their children are, and we won't ever get any of the text outside of `Here's some text`. Don't worry, these won't actually be displayed.
That's really all we need on the JS side, for now. Let's take a look at the native side.
## Setup the view manager
Because we need to have two separate native views, we are going to create two view managers for this module. Both of them will be identical, except for the root view, we will need to pass the `RCTBridge` to the shadow view.
@objc(RNUITextViewManager)
class RNUITextViewManager: RCTViewManager {
override func view() -> (RNUITextView) {
return RNUITextView()
}
@objc override static func requiresMainQueueSetup() -> Bool {
return true
}
override func shadowView() -> RCTShadowView {
// Pass the bridge to the shadow view
return RNUITextViewShadow(bridge: self.bridge)
}
}
@objc(RNUITextViewChildManager)
class RNUITextViewChildManager: RCTViewManager {
override func view() -> (RNUITextViewChild) {
return RNUITextViewChild()
}
@objc override static func requiresMainQueueSetup() -> Bool {
return true
}
override func shadowView() -> RCTShadowView {
return RNUITextViewChildShadow()
}
}
## Create the root shadow view
First we need to create a new class, `RNUITextViewShadow` which is a subclass of `RCTShadowView`. We also need to create the `init()` that receives the bridge saves it. Finally, there are a few functions that we need to override.
class RNUITextView: RCTShadowView {
@objc var numberOfLines: Int = 0 {
didSet {
// We will use this later
}
}
@objc var allowsFontScaling: Bool = true
// For storing our created string
var attributedText: NSAttributedString = NSAttributedString()
// For storing the frame size when we first calculate it
var frameSize: CGSize = CGSize()
// For storing the line height when we create the styles
var lineHeight: CGFloat = 0
init(bridge: RCTBridge) {
self.bridge = bridge
super.init()
}
// Tell react to not use flexbox for this view
override func isYogaLeafNode() -> Bool {
return true
}
override func insertReactSubview(_ subview: RCTShadowView!, at atIndex: Int) {
// We only want to insert shadow view children
if subview.isKind(of: RNUITextViewChildShadow.self) {
super.insertReactSubview(subview, at: atIndex)
}
}
// Update the text when subviews change
override func didUpdateReactSubviews() {
self.setAttributedText()
}
override func layoutSubviews(with layoutContext: RCTLayoutContext) {
// We will use this later
}
override func dirtyLayout() {
super.dirtyLayout()
// This will tell React to remeasure the view
YGNodeMarkDirty(self.yogaNode)
}
func setAttributedText() -> Void {
// We will style the text here
}
func getNeededSize(maxWidth: Float) -> YGSize {
// Here we will determine the required container size for the styled text
}
}
Let's briefly review what is going to happen here:
1. We tell React to not use flexbox for layout, but instead to use a custom function (which we will set up shortly) for measurements.
2. Receive the necessary props from the root view.
3. Manage subview insertions and overriding the default layout. We can't layout until the `YGNode` has been measured, which is what we use `YGNodeIsDirty()` for.
4. Any time our subviews update, we recreate the attributed string and (shortly) tell React to re-measure the `YGNode`.
Let's start implementing that.
## Creating our styled text
Styling the text is fairly simple. This is a super brief way that you can do so. Feel free to add whatever other styles you want!
func setAttributedText() -> Void {
// Create an attributed string to store each of the segments
let finalAttributedString = NSMutableAttributedString()
self.reactSubviews().forEach { child in
guard let child = child as? RNUITextViewChildShadow else {
return
}
let scaledFontSize = self.allowsFontScaling ?
UIFontMetrics.default.scaledValue(for: child.fontSize) : child.fontSize
let font = UIFont.systemFont(ofSize: scaledFontSize, weight: child.getFontWeight())
// Set some generic attributes that don't need ranges
let attributes: [NSAttributedString.Key:Any] = [
.font: font,
.foregroundColor: child.color,
]
// Create the attributed string with the generic attributes
let string = NSMutableAttributedString(string: child.text, attributes: attributes)
// Set the paragraph style attributes if necessary
let paragraphStyle = NSMutableParagraphStyle()
if child.lineHeight != 0.0 {
paragraphStyle.minimumLineHeight = child.lineHeight
paragraphStyle.maximumLineHeight = child.lineHeight
string.addAttribute(
NSAttributedString.Key.paragraphStyle,
value: paragraphStyle,
range: NSMakeRange(0, string.length)
)
// Store that height
self.lineHeight = child.lineHeight
} else {
self.lineHeight = font.lineHeight
}
finalAttributedString.append(string)
}
self.attributedText = finalAttributedString
self.dirtyLayout()
}
A few things to note here:
First, notice that we are saving the line height for later. This is because we need to know what our line height is set to for measuring the text container size. If a line height isn't supplied in the React view's props, then we need to use the default line height for the font we are using.
Second, notice that we are calling `dirtyLayout()` as soon as we have changed our text. This is going to tell React that it's time to re-measure the view.
Let's also setup the logic to determine the size of the container.
func getNeededSize(maxWidth: Float) -> YGSize {
// Create the max size and figure out the size of the entire text
let maxSize = CGSize(width: CGFloat(maxWidth), height: CGFloat(MAXFLOAT))
let textSize = self.attributedText.boundingRect(with: maxSize, options: .usesLineFragmentOrigin, context: nil)
// Figure out how many total lines there are
let totalLines = Int(ceil(textSize.height / self.lineHeight))
// Default to the text size
var neededSize: CGSize = textSize.size
// If the total lines > max number, return size with the max
if self.numberOfLines != 0, totalLines > self.numberOfLines {
neededSize = CGSize(width: CGFloat(maxWidth), height: CGFloat(CGFloat(self.numberOfLines) * self.lineHeight))
}
self.frameSize = neededSize
return YGSize(width: Float(neededSize.width), height: Float(neededSize.height))
}
This is pretty straight forward as well. If you're used to just being able to use `sizeToFit()` on a `UILabel` or `UITextView`, we unfortunately can't do that in this case. We need to determine these dimensions *before* setting the text, otherwise React won't know the proper size until after the text appears - creating a flicker.
## Setting the measure function and laying out
Inside of our initializer, we are going to set the measure function for our `YGNode`.
init(bridge: RCTBridge) {
self.bridge = bridge
super.init()
// We need to set a custom measure func here to calculate the height correctly
YGNodeSetMeasureFunc(self.yogaNode) { node, width, widthMode, height, heightMode in
// Get the shadowview and determine the needed size to set
let shadowView = Unmanaged<RNUITextViewShadow>.fromOpaque(YGNodeGetContext(node)).takeUnretainedValue()
return shadowView.getNeededSize(maxWidth: width)
}
}
Now, when React renders this component, it will automatically be set to the appropriate size for our text!
Whenever it's time to layout the views, we need to actually update the `UITextView`. This view, however, doesn't live inside of the shadow view, but rather inside of the `UIView` for this component. Therefore, we need to get that view and update it's text. Here's how we can do that.
override func layoutSubviews(with layoutContext: RCTLayoutContext) {
// Don't do anything if the layout is dirty
if(YGNodeIsDirty(self.yogaNode)) {
return
}
// Update the text
self.bridge.uiManager.addUIBlock { uiManager, viewRegistry in
// Try to get the view
guard let textView = viewRegistry?[self.reactTag] as? RNUITextView else {
return
}
// Set the text, along with some other properties. We will set this view up now.
textView.setText(string: self.attributedText, size: self.frameSize, numberOfLines: self.numberOfLines)
}
}
## The child shadow view
Before we continue, we also need to create that child shadow view we are using above. This is a very simple one, and is only for receiving the props.
// We want all of our props to be available in the child's shadow view so we
// can create the attributed text before mount and calculate the needed size
// for the view.
class RNUITextViewChildShadow: RCTShadowView {
@objc var text: String = ""
@objc var color: UIColor = .black
@objc var fontSize: CGFloat = 16.0
@objc var fontStyle: String = "normal"
@objc var fontWeight: String = "normal"
@objc var letterSpacing: CGFloat = 0.0
@objc var lineHeight: CGFloat = 0.0
@objc var pointerEvents: NSString?
override func isYogaLeafNode() -> Bool {
return true
}
override func didSetProps(_ changedProps: [String]!) {
guard let superview = self.superview as? RNUITextViewShadow else {
return
}
if !YGNodeIsDirty(superview.yogaNode) {
superview.setAttributedText()
}
}
func getFontWeight() -> UIFont.Weight {
switch self.fontWeight {
case "bold":
return .bold
case "normal":
return .regular
case "100":
return .ultraLight
case "200":
return .ultraLight
case "300":
return .light
case "400":
return .regular
case "500":
return .medium
case "600":
return .semibold
case "700":
return .semibold
case "800":
return .bold
case "900":
return .heavy
default:
return .regular
}
}
}
Also, go ahead and create the `RNUITextViewChild` class.
class RNUITextViewChild: UIView {
@objc var text: String?
@objc var onPress: RCTDirectEventBlock?
}
## The main view
The main view is a subclass of UIView. We will override a few of the views functions, and create the `UITextView` in the init.
class RNUITextView: UIView {
var textView: UITextView
// Props
@objc var numberOfLines: Int = 0 {
didSet {
textView.textContainer.maximumNumberOfLines = numberOfLines
}
}
@objc var selectable: Bool = true {
didSet {
textView.isSelectable = selectable
}
}
@objc var ellipsizeMode: String = "tail" {
didSet {
textView.textContainer.lineBreakMode = self.getLineBreakMode()
}
}
@objc var onTextLayout: RCTDirectEventBlock?
// Init
override init(frame: CGRect) {
// Use the appropriate TextKit version
if #available(iOS 16.0, *) {
textView = UITextView(usingTextLayoutManager: false)
} else {
textView = UITextView()
}
// Disable scrolling
textView.isScrollEnabled = false
// Remove all the padding
textView.textContainerInset = .zero
textView.textContainer.lineFragmentPadding = 0
// Remove other properties
textView.isEditable = false
textView.backgroundColor = .clear
// Init
super.init(frame: frame)
self.clipsToBounds = true
// Add the view
addSubview(textView)
// Add gestures for onPress
let tapGestureRecognizer = UITapGestureRecognizer(target: self, action: #selector(callOnPress(_:)))
tapGestureRecognizer.isEnabled = true
textView.addGestureRecognizer(tapGestureRecognizer)
}
required init?(coder: NSCoder) {
fatalError("init(coder:) has not been implemented")
}
// Resolves some animation issues
override func reactSetFrame(_ frame: CGRect) {
UIView.performWithoutAnimation {
super.reactSetFrame(frame)
}
}
// This is the function called from the shadow view.
func setText(string: NSAttributedString, size: CGSize, numberOfLines: Int) -> Void {
self.textView.frame.size = size
self.textView.textContainer.maximumNumberOfLines = numberOfLines
self.textView.attributedText = string
self.textView.selectedTextRange = nil
if let onTextLayout = self.onTextLayout {
var lines: [String] = []
textView.layoutManager.enumerateLineFragments(
forGlyphRange: NSRange(location: 0, length: textView.attributedText.length))
{ (rect, usedRect, textContainer, glyphRange, stop) in
let characterRange = self.textView.layoutManager.characterRange(forGlyphRange: glyphRange, actualGlyphRange: nil)
let line = (self.textView.text as NSString).substring(with: characterRange)
lines.append(line)
}
onTextLayout([
"lines": lines
])
}
}
@IBAction func callOnPress(_ sender: UITapGestureRecognizer) -> Void {
// If we find a child, then call onPress
if let child = getPressed(sender) {
if textView.selectedTextRange == nil, let onPress = child.onPress {
onPress(["": ""])
} else {
// Clear the selected text range if we are not pressing on a link
textView.selectedTextRange = nil
}
}
}
// Try to get the pressed segment
func getPressed(_ sender: UITapGestureRecognizer) -> RNUITextViewChild? {
let layoutManager = textView.layoutManager
var location = sender.location(in: textView)
// Remove the padding
location.x -= textView.textContainerInset.left
location.y -= textView.textContainerInset.top
// Get the index of the char
let charIndex = layoutManager.characterIndex(
for: location,
in: textView.textContainer,
fractionOfDistanceBetweenInsertionPoints: nil
)
for child in self.reactSubviews() {
if let child = child as? RNUITextViewChild, let childText = child.text {
let fullText = self.textView.attributedText.string
let range = fullText.range(of: childText)
if let lowerBound = range?.lowerBound, let upperBound = range?.upperBound {
if charIndex >= lowerBound.utf16Offset(in: fullText) && charIndex <= upperBound.utf16Offset(in: fullText) {
return child
}
}
}
}
return nil
}
func getLineBreakMode() -> NSLineBreakMode {
switch self.ellipsizeMode {
case "head":
return .byTruncatingHead
case "middle":
return .byTruncatingMiddle
case "tail":
return .byTruncatingTail
case "clip":
return .byClipping
default:
return .byTruncatingTail
}
}
}
## Going Further
With more implementations of things like `onTextLayout`, you can bring this into near parity with the exsiting `<Text>` component, and create a drop-in replacement for those times when you need to just do a bit more with text.
It's also possible to render Markdown with NSAttributedString! See [https://developer.apple.com/documentation/foundation/nsattributedstring/3796598-init](https://developer.apple.com/documentation/foundation/nsattributedstring/3796598-init)
Whatever you want to do, this should get you most of the way there!
# 🥳
"